Eclipse prompt for arg when launching an application

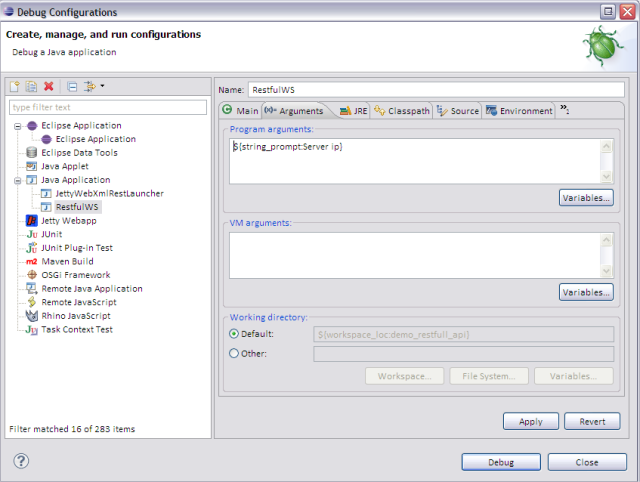
There are many secrets kept from your eyes in eclipse. It’s not that the gui is hiding anything, but we don’t take the time to explore all his possibilities. Did you know you can pass dynamic parameters when launching your program ?

Just go to:
Run Configurations > Select your Java Application > Arguments tab > Variables
eclipse run configurations parameters

Posted in eclipse, tools | Tagged , , , | Leave a comment

Difference between two dates in java

The easiest way to get the difference between two dates without using a third library is using the TimeUnitclass. Be careful, the result is rounded.

I use this code mostly when I need to render a human readable interval.

Notice also the use of SimpleDateFormat, a very useful class which allows to convert String to Date and vice versa.

import java.text.ParseException;
import java.text.SimpleDateFormat;
import java.util.Date;
import java.util.concurrent.TimeUnit;

public class DiffTwoDate {

    public static void main(String[] args) throws ParseException {
       
        SimpleDateFormat sdf = new SimpleDateFormat("yyyy-MM-dd HH:mm:ss");
        
        Date recent = new Date();
        System.out.println("First date: " + sdf.format(recent));
        
        Date older = sdf.parse("2011-10-23 12:45:34");
        System.out.println("Seconde date: " + sdf.format(older));
        
        // Render in days
        TimeUnit inDays = TimeUnit.DAYS;
        
        // Convert into milliseconds
        long diff = recent.getTime() - older.getTime();
        
        System.out.println("Diff in days (rounded):" + inDays.convert(diff, TimeUnit.MILLISECONDS));

    }

}
Posted in java programming | Tagged , , | Leave a comment

A web server embedded in your java application with Jetty

The more I work with Jetty, the more I love it. It’s really amazing to have a web server in your hand that you can modify at will. I like being able to include a light web server in my application even on tiny programs.

Here is all you need : Jetty.

The objective of this example is to create a fully working web server in as few lines as possible..

The project structure :

jetty webapp structure project

The main :

package ceb.demo;

import org.eclipse.jetty.server.Server;
import org.eclipse.jetty.webapp.WebAppContext;

public class WebServerWithJetty {

    public static void main(String[] args) throws Exception {

        WebAppContext context = new WebAppContext();
        context.setDefaultsDescriptor("webapp/WEB-INF/webdefault.xml");
        context.setDescriptor("webapp/WEB-INF/web.xml");
        context.setResourceBase("webapp/");
        context.setContextPath("/");

        Server server = new Server(10000);
        server.setHandler(context);
        server.start();
        server.join();

    }

}

Some explanations :

  • The default descriptor (webdefault.xml) is set because I want to be able to override the one which comes by default with Jetty. This file defines the configuration needed for a default web application. If you don’t specify yours then Jetty load his own from this location org.eclipse.jetty.webapp.webdefault.xml. If you look inside, you find the configuration of the servlet which handle static content, the servlet for jsp files and few more parameters.
  • The descriptor (web.xml) contains your own settings, your servlets, filters…
  • The resource base defines the path to your webapp files (static content or jsp source files).
  • The context path is the prefix of your application.
  • The last lines are straightforward, they define the listening port of your application.

The content of the web.xml file (empty now) but it’s here you will insert your servlet settings :

<?xml version="1.0" encoding="UTF-8"?>
<web-app xmlns="http://java.sun.com/xml/ns/j2ee" xmlns:xsi="http://www.w3.org/2001/XMLSchema-instance"
xsi:schemaLocation="http://java.sun.com/xml/ns/j2ee http://java.sun.com/xml/ns/j2ee/web-app_2_4.xsd" version="2.4">

<welcome-file-list>
<welcome-file>/index.jsp</welcome-file>
</welcome-file-list>

</web-app>

webdefault.xml reference.

The index.jsp file :

<%@ page language="java" contentType="text/html; charset=ISO-8859-1"
    pageEncoding="ISO-8859-1"%>
<!DOCTYPE html PUBLIC "-//W3C//DTD HTML 4.01 Transitional//EN" "http://www.w3.org/TR/html4/loose.dtd">
<html>
<head>
<meta http-equiv="Content-Type" content="text/html; charset=ISO-8859-1">
<title>Insert title here</title>
</head>
<body>
Hello world !
</body>
</html>

Now, you will be able to serve static and dynamic content locate in your webapp directory. Your application is accessible from url : http://localhost:10000/

In a future post, you will see how to add servlets, filters to change the default behavior of this application.
Posted in java programming, library | Tagged , , , | 3 Comments

Validate XML schema with Commons Configuration in Java

If you’re looking for a way to generate an XSD file, you should check this link.

There is many ways to change the behavior of a program, one of them is to use a configuration file. If you have many parameters, I found that a configuration file with an xml structure is needed. The problem with xml is that you can easily make a mistake about the content or the structure. Before parsing the content of an xml, you must always check his structure. Commons Configuration is a good library to do the work (download).

The structure of this example :

MyDebug - demo_xml_validationsrcXmlValidation.java - Eclipse

Here is the XML file:

<?xml version="1.0" encoding="UTF-8"?>
<config xmlns:xsi="http://www.w3.org/2001/XMLSchema-instance"
        xsi:noNamespaceSchemaLocation="config.xsd">>
    <params>
        <param><name>parameter1</name><value>value1</value></param>
        <param><name>parameter2</name><value>value2</value></param>
        <param><name>parameter3</name><value>value3</value></param>
        <param><name>parameter4</name><value>value4</value></param>
    </params>
</config>

The XSD generated by online xsd generator :

<?xml version="1.0" encoding="UTF-8"?>
<xs:schema attributeFormDefault="unqualified" elementFormDefault="qualified" xmlns:xs="http://www.w3.org/2001/XMLSchema">
  <xs:element name="config">
    <xs:complexType mixed="true">
      <xs:sequence>
        <xs:element name="params">
          <xs:complexType>
            <xs:sequence>
              <xs:element name="param" maxOccurs="unbounded" minOccurs="0">
                <xs:complexType>
                  <xs:sequence>
                    <xs:element type="xs:string" name="name"/>
                    <xs:element type="xs:string" name="value"/>
                  </xs:sequence>
                </xs:complexType>
              </xs:element>
            </xs:sequence>
          </xs:complexType>
        </xs:element>
      </xs:sequence>
    </xs:complexType>
  </xs:element>
</xs:schema>

Finally the java code :

import org.apache.commons.configuration.ConfigurationException;
import org.apache.commons.configuration.XMLConfiguration;

public class XmlValidation {

    public static void main(String[] args) {

        try {
            XMLConfiguration config = new XMLConfiguration("config.xml");
            config.setSchemaValidation(true);
            config.load();
        } 
        catch (ConfigurationException e) {
            e.printStackTrace();
        }

    }

}

If you change the structure of the xml (without changing the xsd) then you will have a nice exception (org.xml.sax.SAXParseException). For example, I added

<bob/>

tag as a child to the root element.

Other links:
Commons Configuration – How To

Posted in java programming, library | Tagged , , , | Leave a comment

Generate a XSD easily from an existing XML

A xsd file (XML Schema) is a document which specify schema rules of a xml file. If you have a XML file and you want to be sure before using it than it is valid, then you need to have his xsd. You can learn how to create a xsd here. I think it’s a hard work for something that should be fast and easy to do. Here comes an other solution.

The easiest way that I found to generate an XSD from an existing XML file is with this free online tool. The tool does most of the work but you should always go back to check the result and correct it when needed.

Posted in tools | Tagged , | Leave a comment

Simple SFTP example in Java with Jsch

I use Jsch lib to connect in ssh to a remote sftp server.

The program connects to the server, and then count the number of files in the directory and then displays their contents.

import java.util.Vector;
import com.jcraft.jsch.Channel;
import com.jcraft.jsch.ChannelSftp;
import com.jcraft.jsch.JSch;
import com.jcraft.jsch.JSchException;
import com.jcraft.jsch.Session;
import com.jcraft.jsch.SftpException;

public class DemoSftp {

    public static void main(String[] args) throws JSchException, SftpException {

        String hostname = "hostname";
        String login = "login";
        String password = "password";
        String directory = "the directory";

        java.util.Properties config = new java.util.Properties();
        config.put("StrictHostKeyChecking", "no");

        JSch ssh = new JSch();
        Session session = ssh.getSession(login, hostname, 22);
        session.setConfig(config);
        session.setPassword(password);
        session.connect();
        Channel channel = session.openChannel("sftp");
        channel.connect();

        ChannelSftp sftp = (ChannelSftp) channel;
        sftp.cd(directory);
        Vector files = sftp.ls("*");
        System.out.printf("Found %d files in dir %s%n", files.size(), directory);

        for (ChannelSftp.LsEntry file : files) {
            if (file.getAttrs().isDir()) {
                continue;
            }
            System.out.printf("Reading file : %s%n", file.getFilename());
            BufferedReader bis = new BufferedReader(new InputStreamReader(sftp.get(file.getFilename())));
            String line = null;
            while ((line = bis.readLine()) != null) {
                System.out.println(line);
            }
            bis.close();
        }

        channel.disconnect();
        session.disconnect();

    }

}
Posted in java programming, library | Tagged , , , | 7 Comments

Wake on Lan with Java

My house has more computers than people living in. Most of these machines are sleeping. Sometime, I need to retrieve one or more files from one of them. It will be troublesome if I had to walk around to boot them. Here comes this incredible feature : Wake On Lan. it allows you to start a computer remotely just by sending a magic packet on the network. Before coming to the real fun (=the code), you will have to make your computer wake-able. Unfortunately, I don’t have linux computer at home, so this link will only work for MS OS.

To wake a specific computer, you just need to send to the broadcast-ip his mac-address. You can find it easily with this soft if the computer is awake.

The code below is from here. I use it to wake my windows seven desktop.

import java.net.DatagramPacket;
import java.net.DatagramSocket;
import java.net.InetAddress;

public class WakeOnLan {
    
    public static final int PORT = 9;    
    
    public static void main(String[] args) {
        
        if (args.length != 2) {
            System.out.println("Usage: java WakeOnLan <broadcast-ip> <mac-address>");
            System.out.println("Example: java WakeOnLan 192.168.0.255 00:0D:61:08:22:4A");
            System.out.println("Example: java WakeOnLan 192.168.0.255 00-0D-61-08-22-4A");
            System.exit(1);
        }
        
        String ipStr = args[0];
        String macStr = args[1];
        
        try {
            byte[] macBytes = getMacBytes(macStr);
            byte[] bytes = new byte[6 + 16 * macBytes.length];
            for (int i = 0; i < 6; i++) {
                bytes[i] = (byte) 0xff;
            }
            for (int i = 6; i < bytes.length; i += macBytes.length) {
                System.arraycopy(macBytes, 0, bytes, i, macBytes.length);
            }
            
            InetAddress address = InetAddress.getByName(ipStr);
            DatagramPacket packet = new DatagramPacket(bytes, bytes.length, address, PORT);
            DatagramSocket socket = new DatagramSocket();
            socket.send(packet);
            socket.close();
            
            System.out.println("Wake-on-LAN packet sent.");
        }
        catch (Exception e) {
            System.out.println("Failed to send Wake-on-LAN packet: + e");
            System.exit(1);
        }
        
    }
    
    private static byte[] getMacBytes(String macStr) throws IllegalArgumentException {
        byte[] bytes = new byte[6];
        String[] hex = macStr.split("(\\:|\\-)");
        if (hex.length != 6) {
            throw new IllegalArgumentException("Invalid MAC address.");
        }
        try {
            for (int i = 0; i < 6; i++) {
                bytes[i] = (byte) Integer.parseInt(hex[i], 16);
            }
        }
        catch (NumberFormatException e) {
            throw new IllegalArgumentException("Invalid hex digit in MAC address.");
        }
        return bytes;
    }
   
}

When I’m done and I want to shutdown the machine, I launch this command :

shutdown /m \\MYCOMPUTER /s /y /c “SHUTDOWN”

Posted in java programming | Tagged , , | Leave a comment

Add color to eclipse console output using the log level

You want to add some nice coloring features to the eclipse console ? Maybe you wish to highlight ERROR log with a nice red font, all you need is here. This plug-in is available on the default eclipse marketplace. Don’t be shy, try it.

grep console plug-in

Grep-console plug-in comes with default settings, which are not working so well :(. Don’t worry, you just have to replace that .*(\Q[FATAL]\E).* to .*(\QFATAL\E).* in the grep-console edit expression dialog. Repeat that process for the three others expressions, and you’re done.

eclipse grep console settings

Posted in eclipse | Tagged , , , , , | Leave a comment

Pass through proxy from your java program

How to pass through your company proxy to access http resources on the net ?

This simple code has been tested on a NTLM Authorization Proxy Server, the kind of proxy you find when your company work with MS OS. It use windows authentication. This example access to google home page and display the html content on the console.

import java.io.IOException;
import java.io.InputStream;
import java.io.InputStreamReader;
import java.net.URL;
import java.text.ParseException;
import java.util.Properties;

public class PassThroughProxy {

    public static void main(String... args) throws InterruptedException, ParseException, IOException {

        Properties props = System.getProperties();
        props.put("http.proxyHost", "<proxy-hostname>");
        props.put("http.proxyPort", "<proxy-port>");
        props.put("http.proxyUser", "<NT-domain>\\<NT-login>");
        props.put("http.proxyPassword", "<NT-password>");

        URL google = new URL("http://www.google.fr/");
     
        InputStream is = google.openStream();
        InputStreamReader isr = new InputStreamReader(is);
        logger.debug("Encoding:" + isr.getEncoding());
        
        while ((c = isr.read()) != -1) {
            System.out.print((char) c);
        }
        
        isr.close();
        
    }

}
Posted in java programming | Tagged , , | Leave a comment

Connect to ssh server with java

I often have to write a program to connect to a ssh server and manage tasks. Here is how I do. First you need to download the library. You will find it here, it’s called JSch.

This simple program will connect to a server and execute a command. The output of the command will be displayed in the console.


import java.io.IOException;
import java.io.InputStream;
import com.jcraft.jsch.Channel;
import com.jcraft.jsch.ChannelExec;
import com.jcraft.jsch.JSch;
import com.jcraft.jsch.JSchException;
import com.jcraft.jsch.Session;

public class ConnectToServerWithSSH {

    public static void main(String[] arg) throws JSchException, IOException {

        String host = "hostname";
        String login = "login";
        String password = "password";
        String command = "ls -lrt";

        // If you don't have already accept the public key or else
        // you will have the error <em>com.jcraft.jsch.JSchException: UnknownHostKey: hostname</em>
        java.util.Properties config = new java.util.Properties();
        config.put("StrictHostKeyChecking", "no");

        Sch jsch = new JSch();

        Session session = jsch.getSession(login, hostname, 22);
        session.setTimeout(1000);
        session.setPassword(password);
        session.setConfig(config);
        session.connect();

        Channel channel = session.openChannel("exec");
        ((ChannelExec) channel).setCommand(command);

        channel.connect();

        InputStream in= channel.getInputStream();
        int c;
        StringBuilder output = new StringBuilder();
        while ((c = in.read()) != -1) {
            output.append((char) c);
        }

        channel.disconnect();
        session.disconnect();

        System.out.println(output.toString());

    }

}

Related links :

Posted in java programming | Tagged , , , | 1 Comment